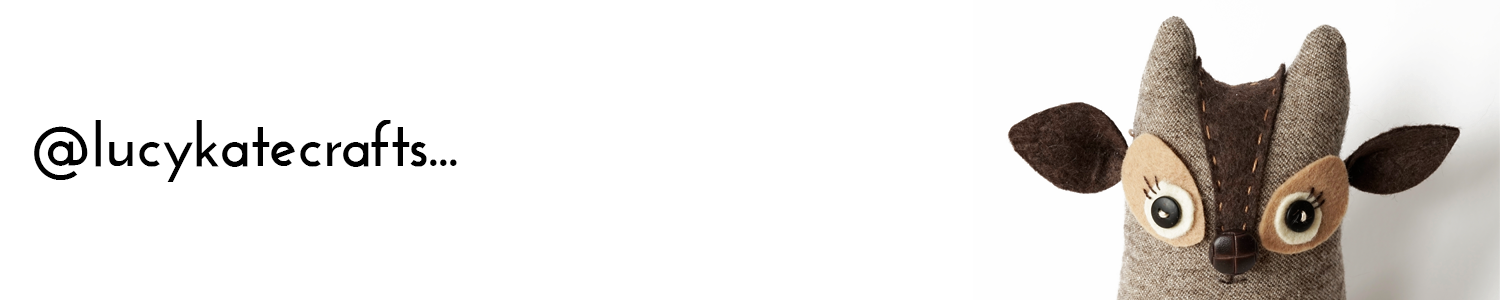
I'm on a quest to find a new way of adding noses to the larger cat softies that I make, like this one here, which popped up on Softies Central this week. After being unable to find suitable triangular shaped pink buttons, it was suggested to me to try polymer clay, and make my own...!

Well, I've given it a try. Maybe the weather is too warm at the moment, I found it really hard to shape as the clay had gone a bit too squidgy or maybe the tools I was using were inappropriate (they were from the kids playdoh set!). I will give it another go, has anyone made their own buttons before? Any tips to share would be much appreciated.
PS, the tantrum free summer is going pretty well, there have been a few close calls but so far, so good!
20 comments:
I make my own buttons etc and because I am no expert all I can offer is to what I do. Pick your weather and practice practice practice. I love the warmer weather because my hand hurts so much when I am forcing it to a shape through my little jigs I have rigged up, however it is hard to make tiny things perfectly if its too soft. The polymer clay sites have the best FAQs there which is where I go. I hope someone comes along with better advise than mine sorry. One more thing. To get a flat button even to start with, roll the clay between 2 icy pole sticks if you dont use a pasta machine and to get nice sharp clean cuts in a pinch use a credit card. Good ol plastic knitting needles are great for rolling around an edge to smooth it gently. Ok im rambling sorry. You can tell I love polymer:)
I tried to make fimo buttons once but they ended up being really brittle. Maybe I was working in the wrong weather or had made them too thin?
I might have to give it another good soon as I really like the idea of unique buttons etc.
Try Premo brand clay as it's harder. Sculpey is REALLY squishy. I like the idea and the shape is cute.
Regarding the button/nose project, you want to make a tool that’s similar to a cookie cutter so you can just roll out some clay and “cookie cut” as many noses as you need. Use a strip of very bendable metal and shape it into the size triangle you need. Make sure the cutter part is very straight and flat so it cuts nice and clean. I hope I’m describing this so you can envision it. Also, put a piece of tile or similar material into the fridge for a while before you roll out the clay on it. That way it will be cool and the clay will not be mushy when you cut. For the button holes, find a tube-like tool, maybe the back end of a ballpoint pen refill. When you poke it into the button, it will remove some of the clay so you have nice clean holes. And finally, if you’d like a very slight curve to the nose rather than a very flat button-like disc, lay the noses on a bit of foil so they bake with a curve that matches the curve of your cat faces. Hope I’ve described this properly. Love your cats. Such beautiful work! Tina
What a great idea - it is a perfect cat's nose.
Excellent button nose there. I think the shape is perfect but I suppose you could try to scout for sugarcraft cutters of different shapes to save time modelling if you need quite a few. Then it's just holes for noses.
We're aiming for a tantrum-free summer too! All fingers crossed. 1, 2, 3....oh dear.
homemade buttons is genius.
I think that button looks perfect!
And well done on the tantrum free start to the holidays.
great idea! I am thinking of making homemade buttons for a thing for my son I just knitted and one thing I want to say I do not want them to be really perfect... I want them to look handmade so your one looks fantastic but as tina mack said put them often to the fridge they harden a lot
I haven't tried this before but I know youtube has vidoes about this. I wish I had one bookmarked for you but I don't -a simple search should do it...good luck!
What a fabulous idea. Make sure the 'blurb' says 'hand crafted buttons' on it!
x
I think this is a really fabulous idea and you shouldn't be put off by the first try - I bet after a while you will get it down to a 't' ... plus a little bit of individuality in each nose isn't a bad thing ;-)
i make earrings out of polymer clay :) ... (see my blog) and i made afew beads and stuff out of it a while ago...
i have never tried buttons, but it seems like a really good idea. its a loverly way to get your own touch into stuff :) or jst add even more personality to something you've made because no 2 will ever be the same...
keep trying, youll be so proud when you get it how you want it :)
laura
you can get triangular pink safety noses for toys in several sizes, they are very cute!
i've never had much success with polymer clay but i've found "miliput" nice to work with and i presume you could colour it while mixing it?
I love making ny buttons out of fimo clay. The reuslts are that you can pretty wel get what you set out to achieve. Perhaps you have kept your clay somewhere too warm to start with. I keep mine in the cool and dark well wrapped up in a tin. This helps you to knead it to the right consistancy to handle.
Once you get the hang of it there will be no stopping you, buttons schmuttons!
I just found your blog through Feeling Stitchy and I'm so glad I did! I just love all of your beautfiul and inspiring creations!
I know I just left you a comment, but I just had to say thank you for the eye patch tutorial. I just about wept! My daughter has been wearing one for 5 years and it's next to impossible to get it on these days. Thank you, thank you, thank you!!!
i think the slightly wonky nose look is cute, but maybe you could try shrink plastic - i dont think you can get it in pink but if you colour a sheet in with pink pencils ten cut out loads of triangles and punch holes in them before you bake them to shrink them - it might be worth a try, if not, kids love to make keyrings out of it!
I made an owl, a toadstool, and then some Totoros from your owl pattern the other day! They turned out great! I posted some pictures on my blog... http://idahocheneys.blogspot.com
Post a Comment